
Picking the Right Hardware for Your OpenStack Cloud in 2026
If you follow our blog, by now you should know that OpenStack Architektur & is famously flexible. At Cloudification, we have seen firsthand how this flexibility can be the reason why most infrastructure decisions succeed or also why they could fail before the first VM is launched. You can deploy OpenStack on almost any x86 hardware, across small labs, private clouds, public clouds or very large enterprise environments. But that flexibility often leads to one of the most common mistakes we see in real-world projects: assuming that OpenStack hardware can be designed once and reused everywhere.
In reality, picking the right hardware for your OpenStack Cloud is an architectural exercise. Different workloads require different resource profiles, and design decisions made early can dramatically affect performance, scalability, and total cost of ownership (TCO) later on. In this article we focus on how to choose hardware for OpenStack deployments, drawing on upstream documentation, vendor-neutral guidance, and large-scale production experience.
You will learn why there is no one-size-fits-all – and how to make the right choices based on workload, scale, and budgets.
There Is No One-Size-Fits-All OpenStack Hardware
The most important rule when designing OpenStack hardware is simple: your infrastructure must follow your use case, not the other way around. A cloud designed primarily for web applications should look different from one intended for AI inference, NFV workloads, or storage-heavy applications.
CPU density, memory-to-core ratios, disk performance, and network bandwidth all need to be aligned with how the cloud will actually be consumed. When designing a public cloud deployment, this is almost impossible to predict.
However, with private cloud setups and migration from other platforms, it is most of the time well known which workloads are planned to run on the new OpenStack cloud. Technically, OpenStack can run on almost any x86 hardware, but performance and stability depend heavily on correct sizing and a clear understanding of workload patterns.
| Use Case | Number of Bare Metal Nodes | Recommended Design |
|---|---|---|
|
Small Clouds / PoCs |
6-20 |
|
|
Mixed Enterprise Workloads |
20-200 |
|
|
HPC or AI/ML Workloads |
10+ |
|
|
Storage Intensive Workloads |
10+ |
Ceph design and sizing must be workload-driven:
Dedicated Ceph clusters per AZ or storage type (e.g. block/object/share) are recommended, as workload choice directly affects performance and cost. |
|
Large Scale / Public Cloud |
100+ |
|
Hyperconverged vs. Non-Hyperconverged Architectures
One of the earliest and most impactful design decisions in an OpenStack deployment is whether to use a hyperconverged architecture or a more traditional, role-separated design.
Check out this article if you want to discover how to use OpenStack with both HCI and non-HCI infrastructure environments.
In a hyperconverged OpenStack setup, compute and storage services typically run on the same physical nodes. Nova Compute services and Ceph OSDs share CPU, memory, disk, and network resources. This approach is attractive because it simplifies procurement and reduces the number of server types required, which lowers entry costs and sometimes speeds up initial deployments.
For small to medium environments, test clusters, or edge deployments, hyperconverged infrastructure works very well. Resource utilization is efficient, operational complexity is reduced, and scaling is straightforward as long as workloads remain predictable.
However, hyperconverged setups start to show limitations as environments grow. Compute and storage begin competing for the same resources, making performance harder to predict under load. Scaling compute automatically scales storage, even when additional capacity or IOPS are not required. In practice, once clusters reach roughly 20 to 30 nodes or begin running storage-intensive workloads, HCI infrastructure might become harder to operate and less efficient with either storage or compute being underutilized. Careful capacity planning should be constantly conducted when deploying larger HCI clusters.
Larger and more performance-sensitive deployments therefore tend to move toward a separated architecture. In this model, controller nodes, compute nodes, and storage nodes are deployed as distinct roles. This separation allows each hardware tier to be optimized for its specific function, improving scalability, fault isolation, and long-term cost efficiency.
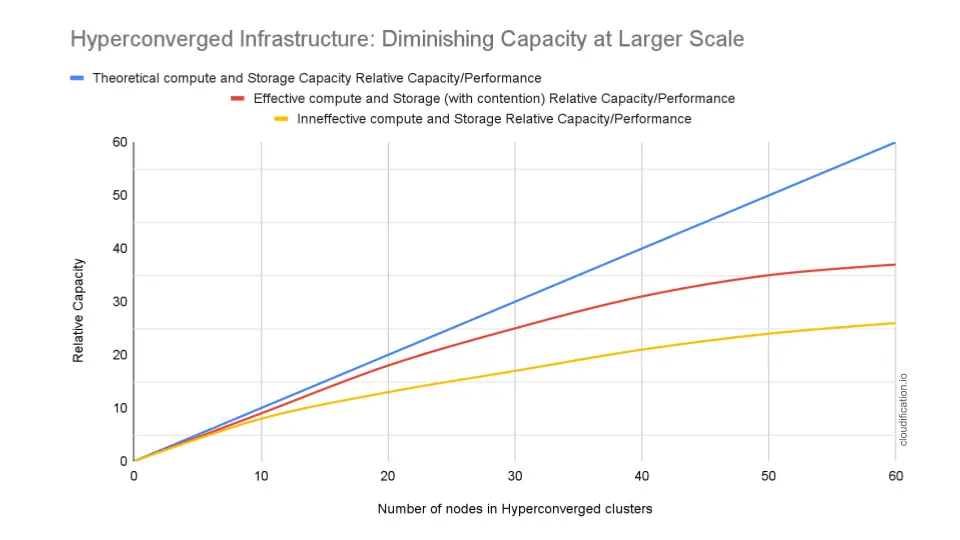
This image illustrates how, in hyperconverged OpenStack environments, compute and storage resources are expanded together because each node contributes both hypervisor capacity and storage disks. The blue line shows the theoretical expectation: every new node adds proportional usable capacity. The red line represents real-world behavior where internal storage replication or CPU contention reduce the effective capacity gained from each additional node.
The yellow line illustrates a common scenario: storage demand grows faster than compute demand. Even when hypervisors still have free CPU and memory, operators must add new nodes to increase storage capacity. As a result, the cloud accumulates unused compute resources while infrastructure cost continues to rise. This effect is a primary reason why larger OpenStack deployments often separate compute and storage roles.
The vertical axis represents relative usable capacity. It describes how much real workload performance the cloud can deliver compared to the theoretical hardware capacity. A lower value means that although more hardware has been installed, a smaller portion of it can be effectively used by workloads.
Control Plane Hardware Considerations
Controller nodes run OpenStack’s core services, including APIs, schedulers, MySQL databases, message queues based on RabbitMQ. Although in most cases they do not host tenant workloads, they are critical to the overall API responsiveness and stability of the cloud.
At Cloudification we always deploy at least three control plane nodes to ensure high-availability of all OpenStack APIs. Worth noting that the number of control plane nodes should be uneven to prevent DB and RabbitMQ cluster split brain situations. As the cloud grows in size one should be able to add +2 more nodes and spread the components and databases across those nodes.
Controller nodes benefit from powerful CPUs, large RAM capacity and fast NVMe drives, especially when used also for Ceph Monitors, Managers and Rados Gateways. However, more powerful hardware means higher initial investment and not everyone has budgets for it. For small deployments, it is possible to combine Control Plane + Compute Nodes together. When doing so, careful planning is required with typically lower overprovisioning factor (cpu_allocation_ratio und ram_allocation_ratio) and host reserved resources configurations in OpenStack nova.conf (reserved_host_cpus und reserved_host_memory_mb settings) to avoid overload scenario.
Compute Nodes and Workload Profiles
Compute nodes host tenant virtual machines, making them the most workload-dependent part of the infrastructure. Hardware choices are driven by the expected VM mix.
General-purpose clouds typically use balanced configurations with single or dual-socket CPUs and moderate memory per core, allowing a wide variety of OpenStack Nova Flavors (VM specs). Memory-intensive workloads such as in-memory databases or analytics platforms require higher RAM density and lower consolidation ratios. CPU-intensive workloads benefit from higher core counts and careful NUMA alignment.
Over the recent years we clearly observe more customers preferring AMD EPYC based platforms for compute due to better performance per cent spent compared to Intel CPUs. AMD EPYC of last generations deliver exceptional core density with up to 192 cores (384 threads) per CPU making it a great fit for single-socket compact (1/2U) compute platforms as well as multi-socket systems. Overall, the x86 server CPU market is still dominated by Intel, but AMD market share (about 28% as of 2025) is rapidly increasing with all major vendors offering AMD EPYC based systems today.
When it comes to over-commitment, particularly CPU over-commitment, it is commonly set in ranges between 2-16x to increase utilization, but it must be applied cautiously. We commonly set a CPU overprovisioning factor of 3-4x in our c12n.cloud deployments, but for CPU-sensitive workloads and HPC this value might even be too high. Since the overprovisioning factor can be changed anytime after the installation (and even individually for different compute nodes) it is worth starting with a lower factor initially and increasing it as the cluster fills up in case there is underutilization.
For time sensitive, HPC, gaming and real-time analytics workloads, OpenStack offers an option to do CPU pinning (CPU affinity) allowing to ensure that vCPU core will be bound to the same physical CPU core on the hypervisor and won’t be shuffled around. Such affinity allows to decrease the latency and boost performance for VMs and workloads that really need it due to NUMA alignment and L1/L2 Cache usage optimization. In order to enable CPU pinning in OpenStack for a specific flavor you would need to add hw:cpu_policy=dedicated property:
$ openstack flavor set $FLAVOR --property hw:cpu_policy=dedicatedOne could also set the policy on a Glance Image to apply it only to VMs created from that base OS image:
$ openstack image set $IMAGE --property hw_cpu_policy=dedicatedThe following OpenStack documentation on the CPU topologies is helpful when it comes to configuring NUMA or CPU pinning policies.
Storage Design and Hardware Reality
Storage is often the most performance-sensitive and least forgiving component of an OpenStack deployment. Storage design decisions have a disproportionate impact on VM and application performance, operational stability, and total cost of ownership. Fixing storage design mistakes later is usually expensive and disruptive, which makes careful upfront planning essential.
Software-defined storage — most commonly Ceph — is widely used with OpenStack because it provides block, object, and image storage in a single, unified platform. A single Ceph cluster can serve block, object and share storage at the same time. Ceph scales horizontally to tens of petabytes, avoids vendor lock-in, and can be built on commodity hardware. However, Ceph does not deliver “free performance” and must be designed for the expected workload.
If you are not yet familiar with Ceph, you can check this article.
Ceph Cluster Design Best Practices
A very common reason for disappointing OpenStack cloud performance is often not OpenStack itself but an under-sized Ceph cluster. Ceph is extremely scalable and reliable, but it is not lightweight. A common cause of poor Ceph performance is underestimating the hardware requirements per OSD. Each OSD is effectively a small storage server running distributed consensus, replication, recovery, and background data balancing simultaneously. If hardware resources are underestimated, the first symptoms will appear during recovery, rebalancing, or peak workloads:
CPU
Plan 1–2 dedicated CPU cores per OSD for HDD-based clusters and more (is better) for NVMe clusters. CPU starvation will affect recovery and rebalancing and especially bad in HCI setups.
Memory: Ceph daemons are memory-intensive, especially modern BlueStore-based OSDs. Older rules of thumb suggested 6-8 GB RAM per OSD, but recent Ceph versions increased the official baseline. A more realistic planning guideline today would
- Minimum: ~10 GB RAM per OSD (current upstream guidance)
- Recommended for HDD clusters: ~12 GB per OSD in production environments
- NVMe OSDs: similar baseline, but dependent on available system RAM and workload
In our c12n private cloud deployments, we regularly see real-world RAM consumption approaching these higher values, particularly during recovery, rebalancing and Kubernetes-heavy workloads.
Important: the configured memory target is not a hard limit. In practice, Ceph may temporarily use ~150% of the configured memory during heavy activity such as recovery or backfill.
Also consider that larger BlueStore DB sizes increase RAM usage, and that metadata-heavy workloads (many small files, Kubernetes, CI/CD artifacts, container registries) significantly increase memory pressure. That is why under-sizing RAM does not only reduce performance but it directly affects cluster stability during recovery events.
Storage layout:Storage design decisions have a bigger impact on Ceph performance than raw hardware speed.
- Do not mix storage classes in the same pool, e.g., HDD and SSD (absolute performance killer!)
- If using HDDs, make sure to use 4,096-byte sector size (4Kn) drives, which provide better efficiency and alignment with BlueStore.
- Try to keep OSD disk sizes uniform and capacity per node reasonable (going beyond 200 TB needs good planning and not recommended for HCI setups)
- BlueStore DB/WAL Placement is is frequently confused with the old Ceph “cache tiering” feature (which is now deprecated). We are not talking about cache pools.
- Use NVMe or fast SSDs for BlueStore DB/WAL when data is kept on HDDs. Placing BlueStore metadata on fast devices dramatically improves latency and small-IO performance. This is one of the most impactful optimizations you can do for HDD clusters.
- Consider adding a Caching Tier based on NVMe if using HDDs for better performance
- Ceph reliability improves with scale. The more nodes there are in a Ceph cluster, the more stable the cluster is, the faster it recovers, and the less sensitive it is to individual nodes and drive failures. Small clusters work, but they are much more sensitive to hardware failures and maintenance operations.
- NVMe drives change Ceph behavior significantly. Overall, it is best to
- Prefer enterprise NVMe drives.
- Avoid consumer NVMe devices (especially those without power-loss protection)
- Evaluate IOPS capability, not only sequential throughput
- Choose devices based on workload:
- Metadata pools
- BlueStore DB/WAL
- Full data OSDs
- Very large OSDs can also become a bottleneck in loaded clusters. A single drive may provide impressive sequential bandwidth, but Ceph distributes operations across OSDs: fewer, larger drives reduce parallelism and recovery efficiency.
Netzwerk:
- High-bandwidth, stable and low-latency networking is critical
- 10 Gbps is a bare minimum. Recommended 50 Gbps (2×25 Active/Active) or higher (100+ Gbps), especially for large or high-load NVMe/SSD clusters
- Latency impacts performance — poor NICs, Switches or cross-DC stretched networks can hurt
- Avoid overlay networks for Ceph on Kubernetes as those add latency (In our c12n.cloud deployments we use Multus and native VLANs for Ceph traffic)
- Use dedicated NICs and Switches for storage network if budget allows or if running a large cluster
Multiple Hardware Tiers in a Single Cloud
A common misconception is that all workloads in an OpenStack cloud should run on identical hardware. In practice, well-designed environments often include multiple hardware tiers.
General-purpose compute nodes handle the majority of workloads, while high-memory nodes might be reserved for databases or analytics. Separate storage pools can be created for high-performance, low-latency workloads based on NVMe storage class. While for capacity-oriented use cases such as backups or archives an object storage backed by HDDs can be sufficient. The great part about it – OpenStack supports any combinations, you can have multiple Cinder Volume types and make those available to all users of your cloud or only to selected tenants. You can also provide ephemeral storage directly from hypervisors as additional storage for cases where Ceph performance is still not sufficient.
Hyperconverged architectures often look attractive early on, while storage costs are frequently underestimated. Experience shows that storage might become a dominant cost driver over time in HCI if demand didn’t closely match the capacity planning. Dedicated Compute/Storage roles simplify scaling, troubleshooting, and lifecycle management. Needless to say, whether going with HCI or non-HCI deployment, the cost of Ceph storage is significantly lower compared to expensive appliances from NetApp, Dell or other vendors.
Cloudification POV: What We Usually Recommend
After designing and deploying many OpenStack environments, a few patterns repeat themselves. The most stable and cost-efficient platforms are those that start simple, separate concerns early, and leave room to grow. Hyperconverged infrastructure makes sense for small clusters and fast starts, but for anything expected to grow or run storage-heavy workloads, we usually recommend separating compute and storage from the beginning. Dedicated roles make scaling easier, performance more predictable, and operational troubleshooting significantly simpler. Separating network nodes in OpenStack is usually recommended for public cloud providers, but can be useful for other use-cases too.
We also recommend resisting the temptation to buy expensive vendor storage solutions. In many cases, well-designed software-defined storage on commodity hardware delivers better long-term value and avoids vendor lock-in. In the table below, you can find minimum hardware requirements for different node types for typical use cases with OpenStack:
| Role or Tier | Typical Use Case | CPU | Memory |
|---|---|---|---|
|
Small Control Node |
Small labs or PoCs |
8–16 cores |
32–64 GB |
|
Production Control Node |
Medium & large clouds |
16–32 cores |
64–256 GB |
|
General Compute Node |
Generic workloads |
32+ cores |
256 GB+ |
|
High-CPU Compute Node |
CPU-bound workloads |
96+ cores |
512+ GB |
|
Generic Ceph Storage |
General |
24+ cores |
128+ GB |
|
Ceph Storage Node — High IOPS |
Performance and IOPS intensive storage |
32+ cores |
256+ GB |
| Role or Tier | Local Storage | Netzwerk | Notes |
|---|---|---|---|
|
Small Control Node |
2× 500 GB SSD 1x 500 GB SSD |
10+ GbE |
Lightweight controller services; for labs and small deployments |
|
Production Control Node |
2× 1 TB NVMe 1x 1TB NVMe |
25+ GbE |
DB persistence, RabbitMQ volumes and optionally monitoring metrics and logs kept on own storage |
|
General Compute Node |
Optional NVMe for ephemeral storage in OpenStack |
25+ GbE |
Balanced for mixed tenant VMs |
|
High-Memory Compute Node |
Optional NVMe for ephemeral storage in OpenStack |
25+ GbE |
Good for memory-intensive VMs. NUMA alignment is crucial |
|
High-CPU Compute Node |
Optional NVMe for ephemeral storage in OpenStack |
25+ GbE |
Can be used for HPC workloads. CPU and RAM overprovisioning must be carefully configured |
|
Generic Ceph Storage |
NVMe for block storage; HDDs for object storage. Optionally NVMe caching tier for HDDs |
25+ GbE |
Specs depend on the number of OSDs. Plan 2 cores per NVMe and 1 per HDD at minimum. |
|
Ceph Storage Node — High IOPS |
All-NVMe enterprise storage |
100+ GbE |
High-IOPS block or object storage |
Conclusion
Choosing hardware for OpenStack is not about finding a single recommended server model. It is about understanding workloads, growth expectations, and operational constraints, and then designing an architecture that can evolve with them.
When hardware decisions are made deliberately, OpenStack’s flexibility becomes a strength rather than a source of complexity. The result is a cloud that scales predictably, performs reliably, and avoids unnecessary spendings.
Talk to Us About Your OpenStack Design
Choosing the right hardware for OpenStack is not a purely technical decision. It affects cost, scalability, performance, and how easy the platform is to operate years down the line. If you are planning a new OpenStack deployment, scaling an existing one, or reconsidering hyperconverged versus separated architectures, we are happy to help.
At Cloudification, we design and operate OpenStack-based private clouds tailored to real workloads, not generic reference architectures. With the help of our partners we can deliver turnkey cloud platforms with hardware, racking, cabling and complete IaaS/PaaS software layer. Let’s talk about your needs.