Kubernetes Autoscaling
Kubernetes is a versatile system that lets you automate many management tasks, this includes provisioning and scaling of both workloads and underlying infrastructure. Scalability is one of the main features of Kubernetes.
Managing a Kubernetes cluster is no easy task. The larger the cluster, the larger the number of deployed pods needed to spread the load on the system. This constitutes two types of problems, you can either run out of nodes to host those pods, or have too many that are unused whenever the load decreases.
Automating scaling can help you with these problems, since it is a lot quicker than having to manually allocate resources, add or remove nodes. Automation allows you to respond quicker to peaks in demand, and reduce costs by scaling down when resources are not needed.
Understanding the different types of Autoscalers is crucial for getting the most out of your Kubernetes platform.
Let’s dive into it!
Types of AutoScalers
There are three types of autoscaling available in Kubernetes, two of them are pod-based and one is node-based:
- Pod scaling:
- Horizontal Pod Autoscaler (HPA): adjusts the number of replicas of an application controlled by a Deployment, ReplicaSet, etc.
- Vertical Pod Autoscaler (VPA): adjusts the resource requests and limits of a container.
- Horizontal Pod Autoscaler (HPA): adjusts the number of replicas of an application controlled by a Deployment, ReplicaSet, etc.
- Node-based scaling:
- Cluster Autoscaler (CA): adjusts the number of nodes in the cluster when pods fail to schedule or when nodes are underutilized.
Basically there are three ways in which Kubernetes can autoscale and these are either by adjusting the capacity of pods (vertical autoscaling), by adjusting the number of pod replicas (horizontal autoscaling), and/or by adding or removing nodes in a cluster (cluster autoscaling).
When combined, these three dimensions offer great benefits, such as that services run with high stability while at maximum load, and at the same time minimizing costs when the demand is low.
There is a delicate balance to be kept between maintaining an efficient performance and avoiding overprovisioning.
Let’s take a look at each of these approaches in detail:
1. Vertical Pod Autoscaler (VPA)
The VPA is a component you install in your cluster. It can increase or decrease the request and limit of a pod’s CPU and memory in relation to the actual workload. When the workload demand increases, the VPA will increase the resource limits for a pod and conversely, the VPA will decrease the resource limits as the workload demand decreases. These adjustments are based on historical resource usage measurements.
A correct implementation of this tool will ensure that the resources of a Kubernetes cluster are allocated efficiently and automatically.
With VPA you can configure two types of resources, namely requests and limits. The former sets the minimum amount of resourcer that a container needs, while the latter defines the maximum amount of resources that a container can use, preventing it from consuming more than the amount you have previously set. Kubernetes scheduler will take care of arranging the pods in cluster based on their requests.
VPA Components
VPA Recommender:
- Monitors resource utilization and computes target values.
- Looks at the metric history, OOM events, and the VPA deployment spec of a deployment and makes recommendations for a workload’s resource requests
- The limits are raised/lowered based on the limits-requests proportion defined.
- Can be used by itself when you are not sure what the application actually needs
- The recommendations are stored in the status field of the workload’s corresponding VPA API object
VPA Updater:
- Responds to the recommendations based on the update policy defined in the VPA API object.
- Evicts those pods that need the new resource limits.
- Implements whatever the VPA Recommender recommends if “updateMode: Auto“ is set.
VPA Admission Controller:
- Changes the CPU and memory settings (using a webhook) before a new pod starts whenever the VPA Updater evicts and restarts a pod.
- Evicts a pod if it needs to change the pod’s resource requests when the Vertical Pod Autoscaler is set with an updateMode of “Auto.” Due to the design of Kubernetes, the only way to modify the resource requests of a running pod is to recreate the pod.
How does it work?
You can choose to either configure the VPA or to run it in recommendation mode.
With the recommendation mode, the VPA Recommender updates the status field of the workload’s Vertical Pod Autoscaler resource with its suggested values. It however, does not terminate pods or alter pod API requests.
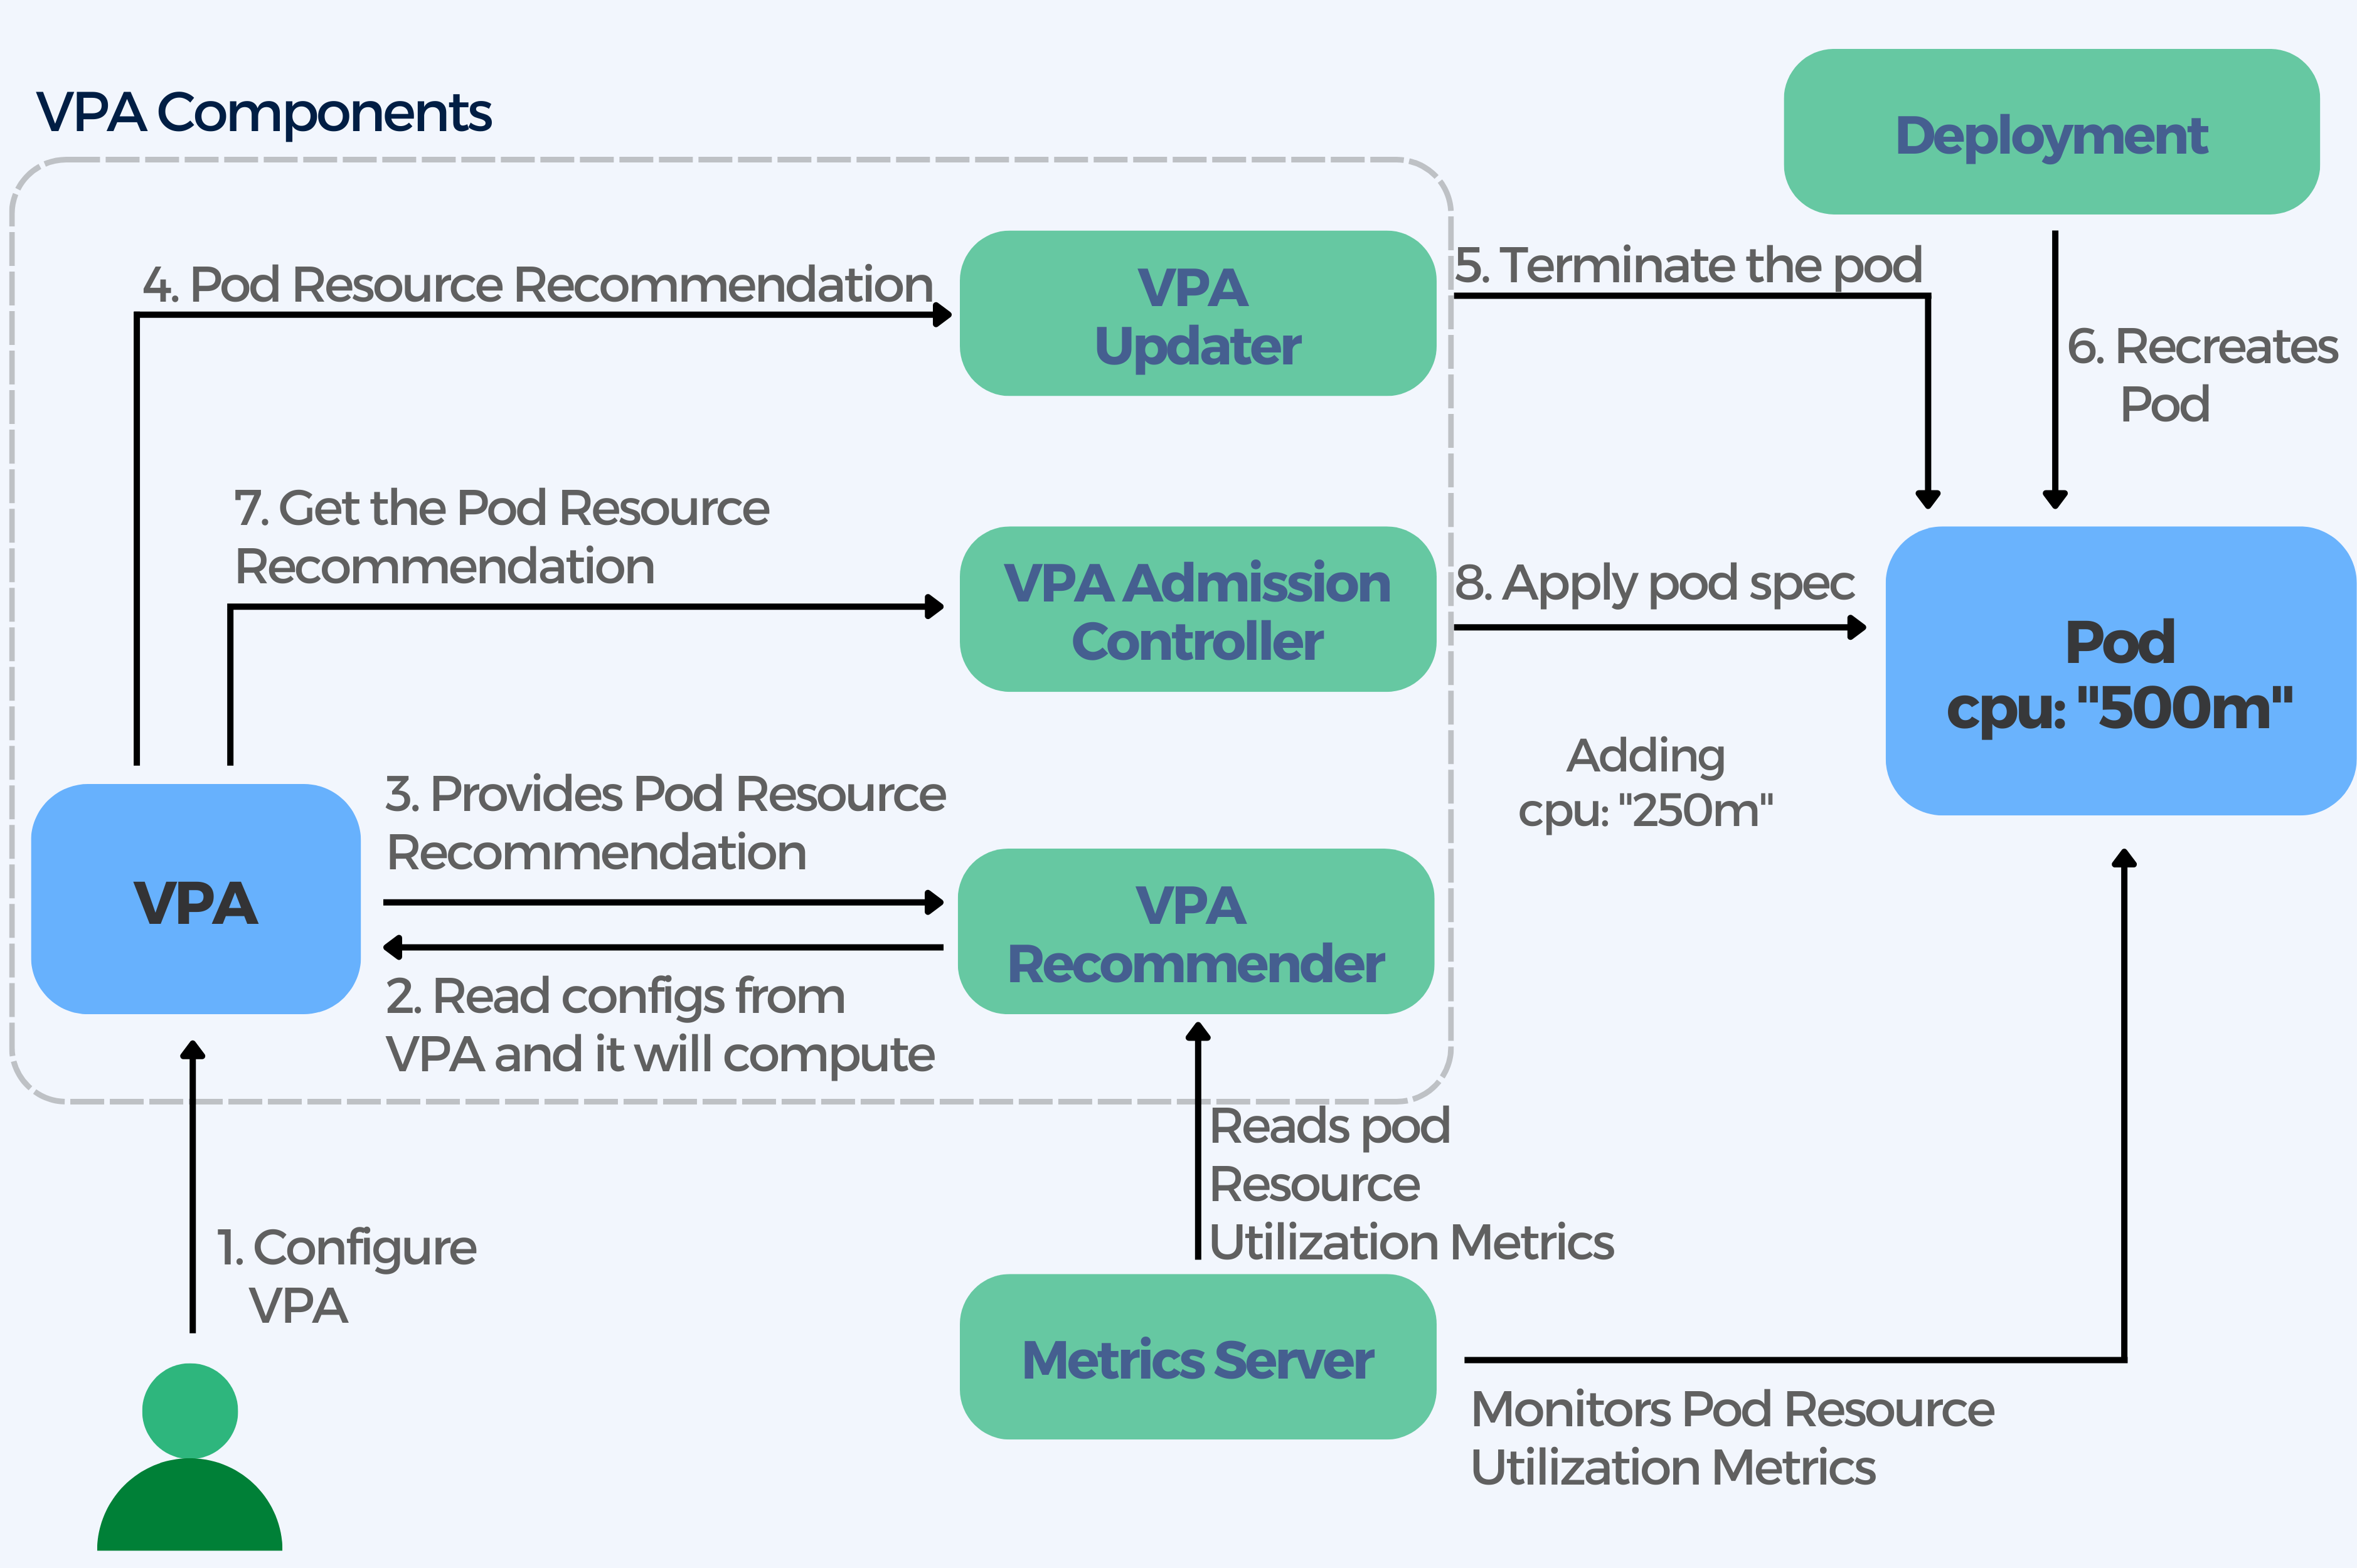
If you choose to configure the VPA, this is what happens:
- VPA Recommender reads the VPA configuration and monitors the metrics across all pods of a deployment
- VPA provides a recommendation for pod resource allocation
- VPA Updater reads the pod resource recommendations
- VPA updates the runtime resource configuration as per the recommendation
- Pods are resized or terminated
- Once the pod is terminated, the deployment recreates the pod to match its replica configuration
- During the pod recreation process, the VPA Admission Controller gets the pod resource recommendation. VPA cannot update existing pods with new limits because Kubernetes does not support dynamically changing the resource limits of a running pod. Therefore it terminates pods that are using outdated limits. When the pod’s controller requests the replacement from the Kubernetes API service, the VPA Admission Controller injects the updated resource request and limit values into the new pod’s specification.
- VPA Admission Controller overwrites the recommendations to the pod.
Limitations
- Updating running pods is still experimental
- Performance in large clusters remains untested
- All running containers may restart if the VPA recreates pods on a different node when updating pod resources
- Not the best for applications that are very small, since the minimum memory allocation the VPA can recommend is 250 MiB. Meaning, if your requests are smaller than 250 MiB, it will be automatically increased to fit this minimum.
- It cannot be used on individual pods which don’t have an owner (controller).
Best Practices
- DO NOT use HPA together with VPA for the same set of pods, unless you configure the HPA to use either custom or external metrics. HPA scales based on the same resource metrics (CPU and MEMORY) usage. When a metric reaches its defined threshold, the scaling event will happen for both VPA and HPA simultaneously, which very likely will lead to issues.
- Use VPA together with Cluster Autoscaler. VPA might recommend more resources than available in the cluster. This can make pods go into a pending status preventing these to be assigned to a node due to insufficient resources causing pods to never run. The cluster autoscaler can help overcome this limitation by spinning up new nodes in response to pending pods. Another possible solution would be setting the LimitRange to the maximum available resources, ensuring that pods do not request more resources than the LimitRange defines.

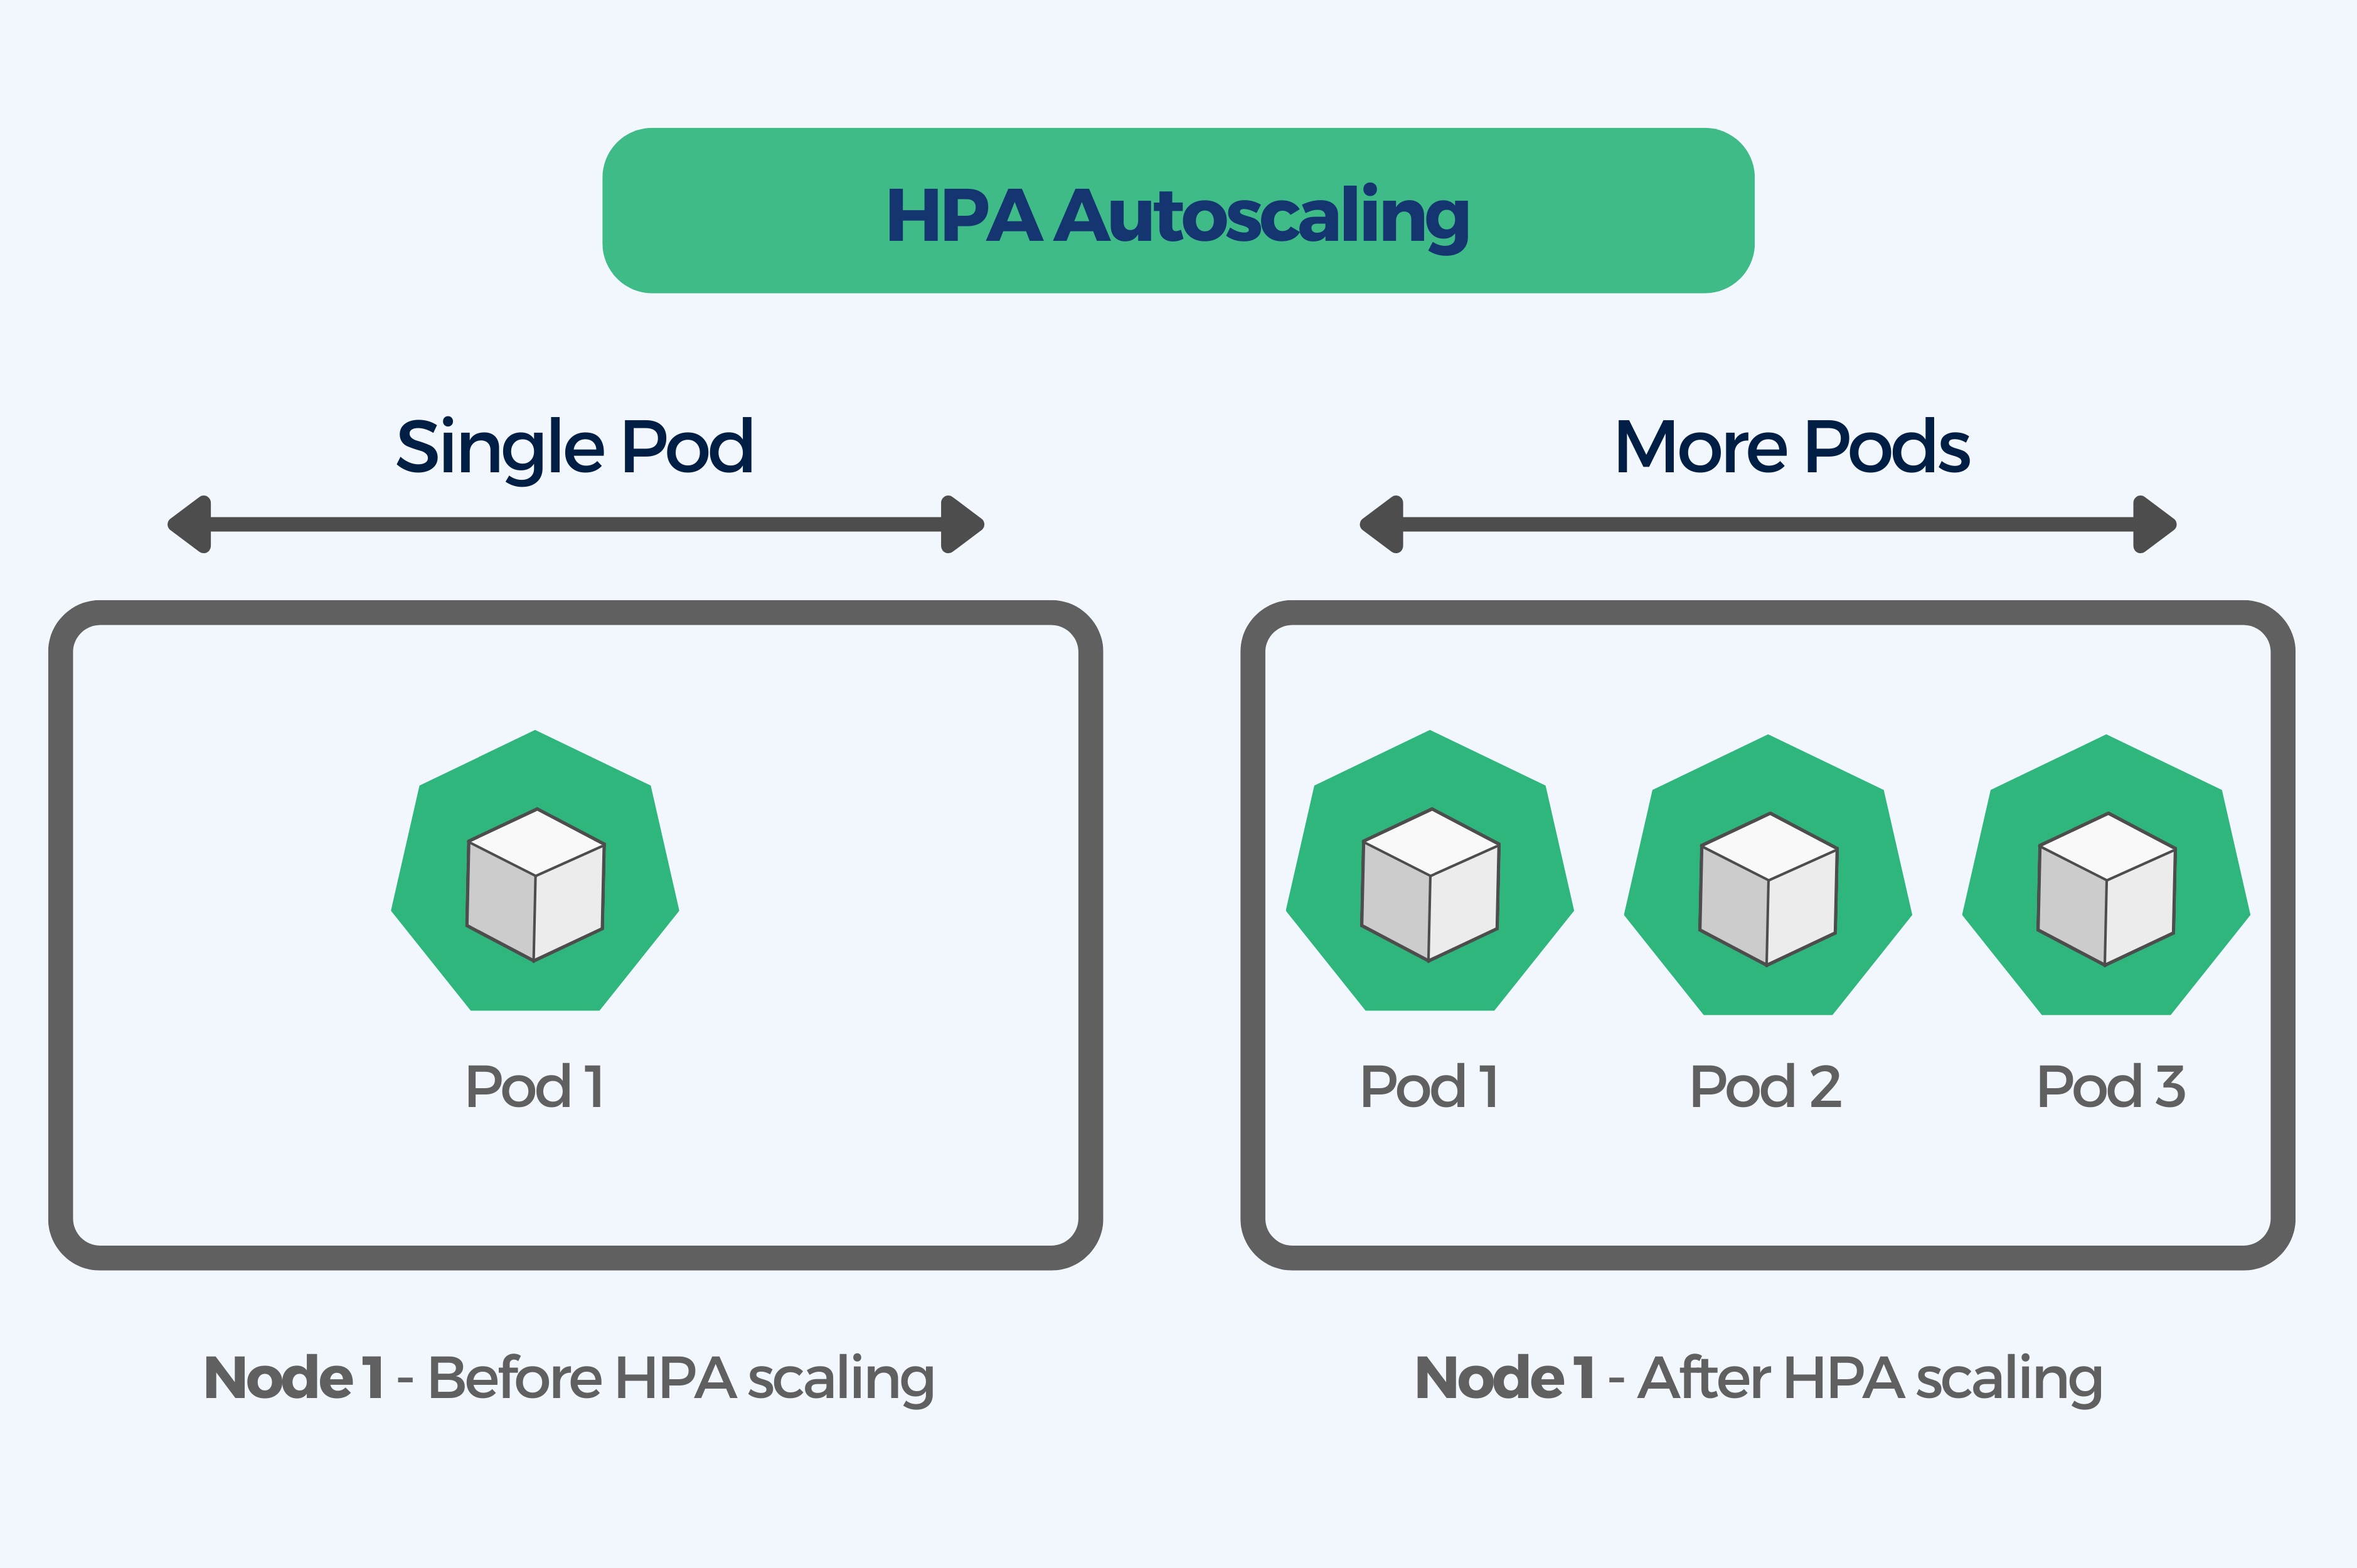
2. Horizontal Pod Autoscaler (HPA)
HPA adjusts the number of pod replicas of an application based on CPU utilization. More pods are added as the workload demand increases, which means that pods are removed as the demand slows down. By replicating or terminating pods in a replication controller – Deployment, ReplicaSet, or StatefulSet, the HPA affects the total pod count. It is called horizontal scaling because it affects the number of instances rather than the resources allocated to a single container.
After the initial configuration, the scaling works automatically. The user sets the MIN and MAX number of replicas and the HPA controller checks the metrics with the help of the Metrics Server to then decide to scale your replicas up or down accordingly. Metrics are checked every 15 seconds by default.
The Metrics Server captures data (CPU and memory usage for nodes and pods) from kubernetes.summary_api and then provides standard resource usage measurement data. It also can collect data from external sources, providing access to custom metrics such as the number of active sessions on a load balancer indicating traffic volumes.
You can pair the HPA automatic scaling with some manual adjustments such as:
- adjusting replica count based on the time of the day;
- set different capacity requirements for weekends or off-peak hours;
- or apply an event-based replica capacity schedule to help account for predictable load fluctuations.
How HPA works
HPA works in a loop that constantly checks, compares and updates metrics and then decides to increase or decrease the number of replica pods to achieve the target value. Here’s how each of the steps in that loop works:
- HPA continuously monitors the metrics server for resource usage across all pods of a deployment
- The number of required replicas is calculated based on the collected resource usage
- The metrics are compared with the target value, if they indicate that the target threshold is breached, HPA sends a “Scale” request to the Kubernetes Master component
- HPA decides to scale up (or down) the application to the desired number of replicas
- Kubernetes Master then changes the desired number of replicas
- Steps repeat
The HPA control loop chooses the largest pod count recommendation in the last five minutes in order to avoid thrashing. Thrashing happens when the HPA performs subsequent autoscaling actions before the workload finishes responding to prior autoscaling actions.
HPA Limitations
- Using HPA together with VPA on memory or CPU when evaluating CPU or memory metrics can be problematic.
- You cannot configure HPA on a ReplicaSet or Replication Controller when using a Deployment. You can only do it on the Deployment itself.
- HPA does not work with DaemonSets (obviously there is 1 DS per node.)
- You could end up either wasting resources or terminating your pods too frequently if your CPU and memory limits on pods are not set correctly.
- HPA can’t scale up until new nodes are added to the cluster whenever the cluster is out of capacity. In this case you can use Cluster Autoscaler (CA) to automate this process.
Best Practices
- Make sure all pods have resource requests configured. All resource request values of all containers should be used so that the data that is needed for making scaling decisions is accurate.
- Try to use custom metrics only. External metrics API can provide access to a large number of metrics which constitutes a security risk. If compromised, a custom metrics API is less risky, since it only holds your specific metrics.
- By using HPA together with Cluster Autoscaler (CA) you can coordinate scalability of pods with the behavior of nodes in the cluster. This way, the Cluster Autoscaler can add eligible nodes when you need to scale up and conversely, it can shut down unneeded nodes to conserve resources when scaling down.
3. Cluster Autoscaler (CA)
The Cluster Autoscaler automatically adds or removes nodes in a cluster based on resource requests from pods in order to provide the right amount of computing resources needed to host the desired workloads.
Unlike the HPA and VPA, this autoscaler does not deal with application autoscaling but with autoscaling the number of worker nodes in a Kubernetes cluster as the usage fluctuates. The cluster autoscaler changes the number of cluster nodes, while HPA scales the number of running cluster pods.
To make a decision, the Cluster Autoscaler checks every 10 seconds to detect pods that could be a pending state. It does not measure CPU and memory usage values directly. The CA adds nodes to accommodate unscheduled pods, and removes nodes when they are not being used.
How CA works
A pod becomes unschedulable (Pending) when the Kubernetes scheduler is unable to find a node that can accommodate the pod. Whenever a kubernetes scheduler fails to find a place to run a pod it sets “schedulable” PodCondition to false and reason to “unschedulable”. For instance when a pod requests more CPU than is available on any of the cluster nodes.
Cluster autoscaler works in a loop looking for unschedulable pods and attempting to consolidate pods that are currently deployed on only a few nodes.
When there are not enough resources and the number of unschedulable pods increases, the CA automatically adds additional nodes to the cluster. Conversely, the CA can merge pods onto fewer nodes to free up a node and terminate it.
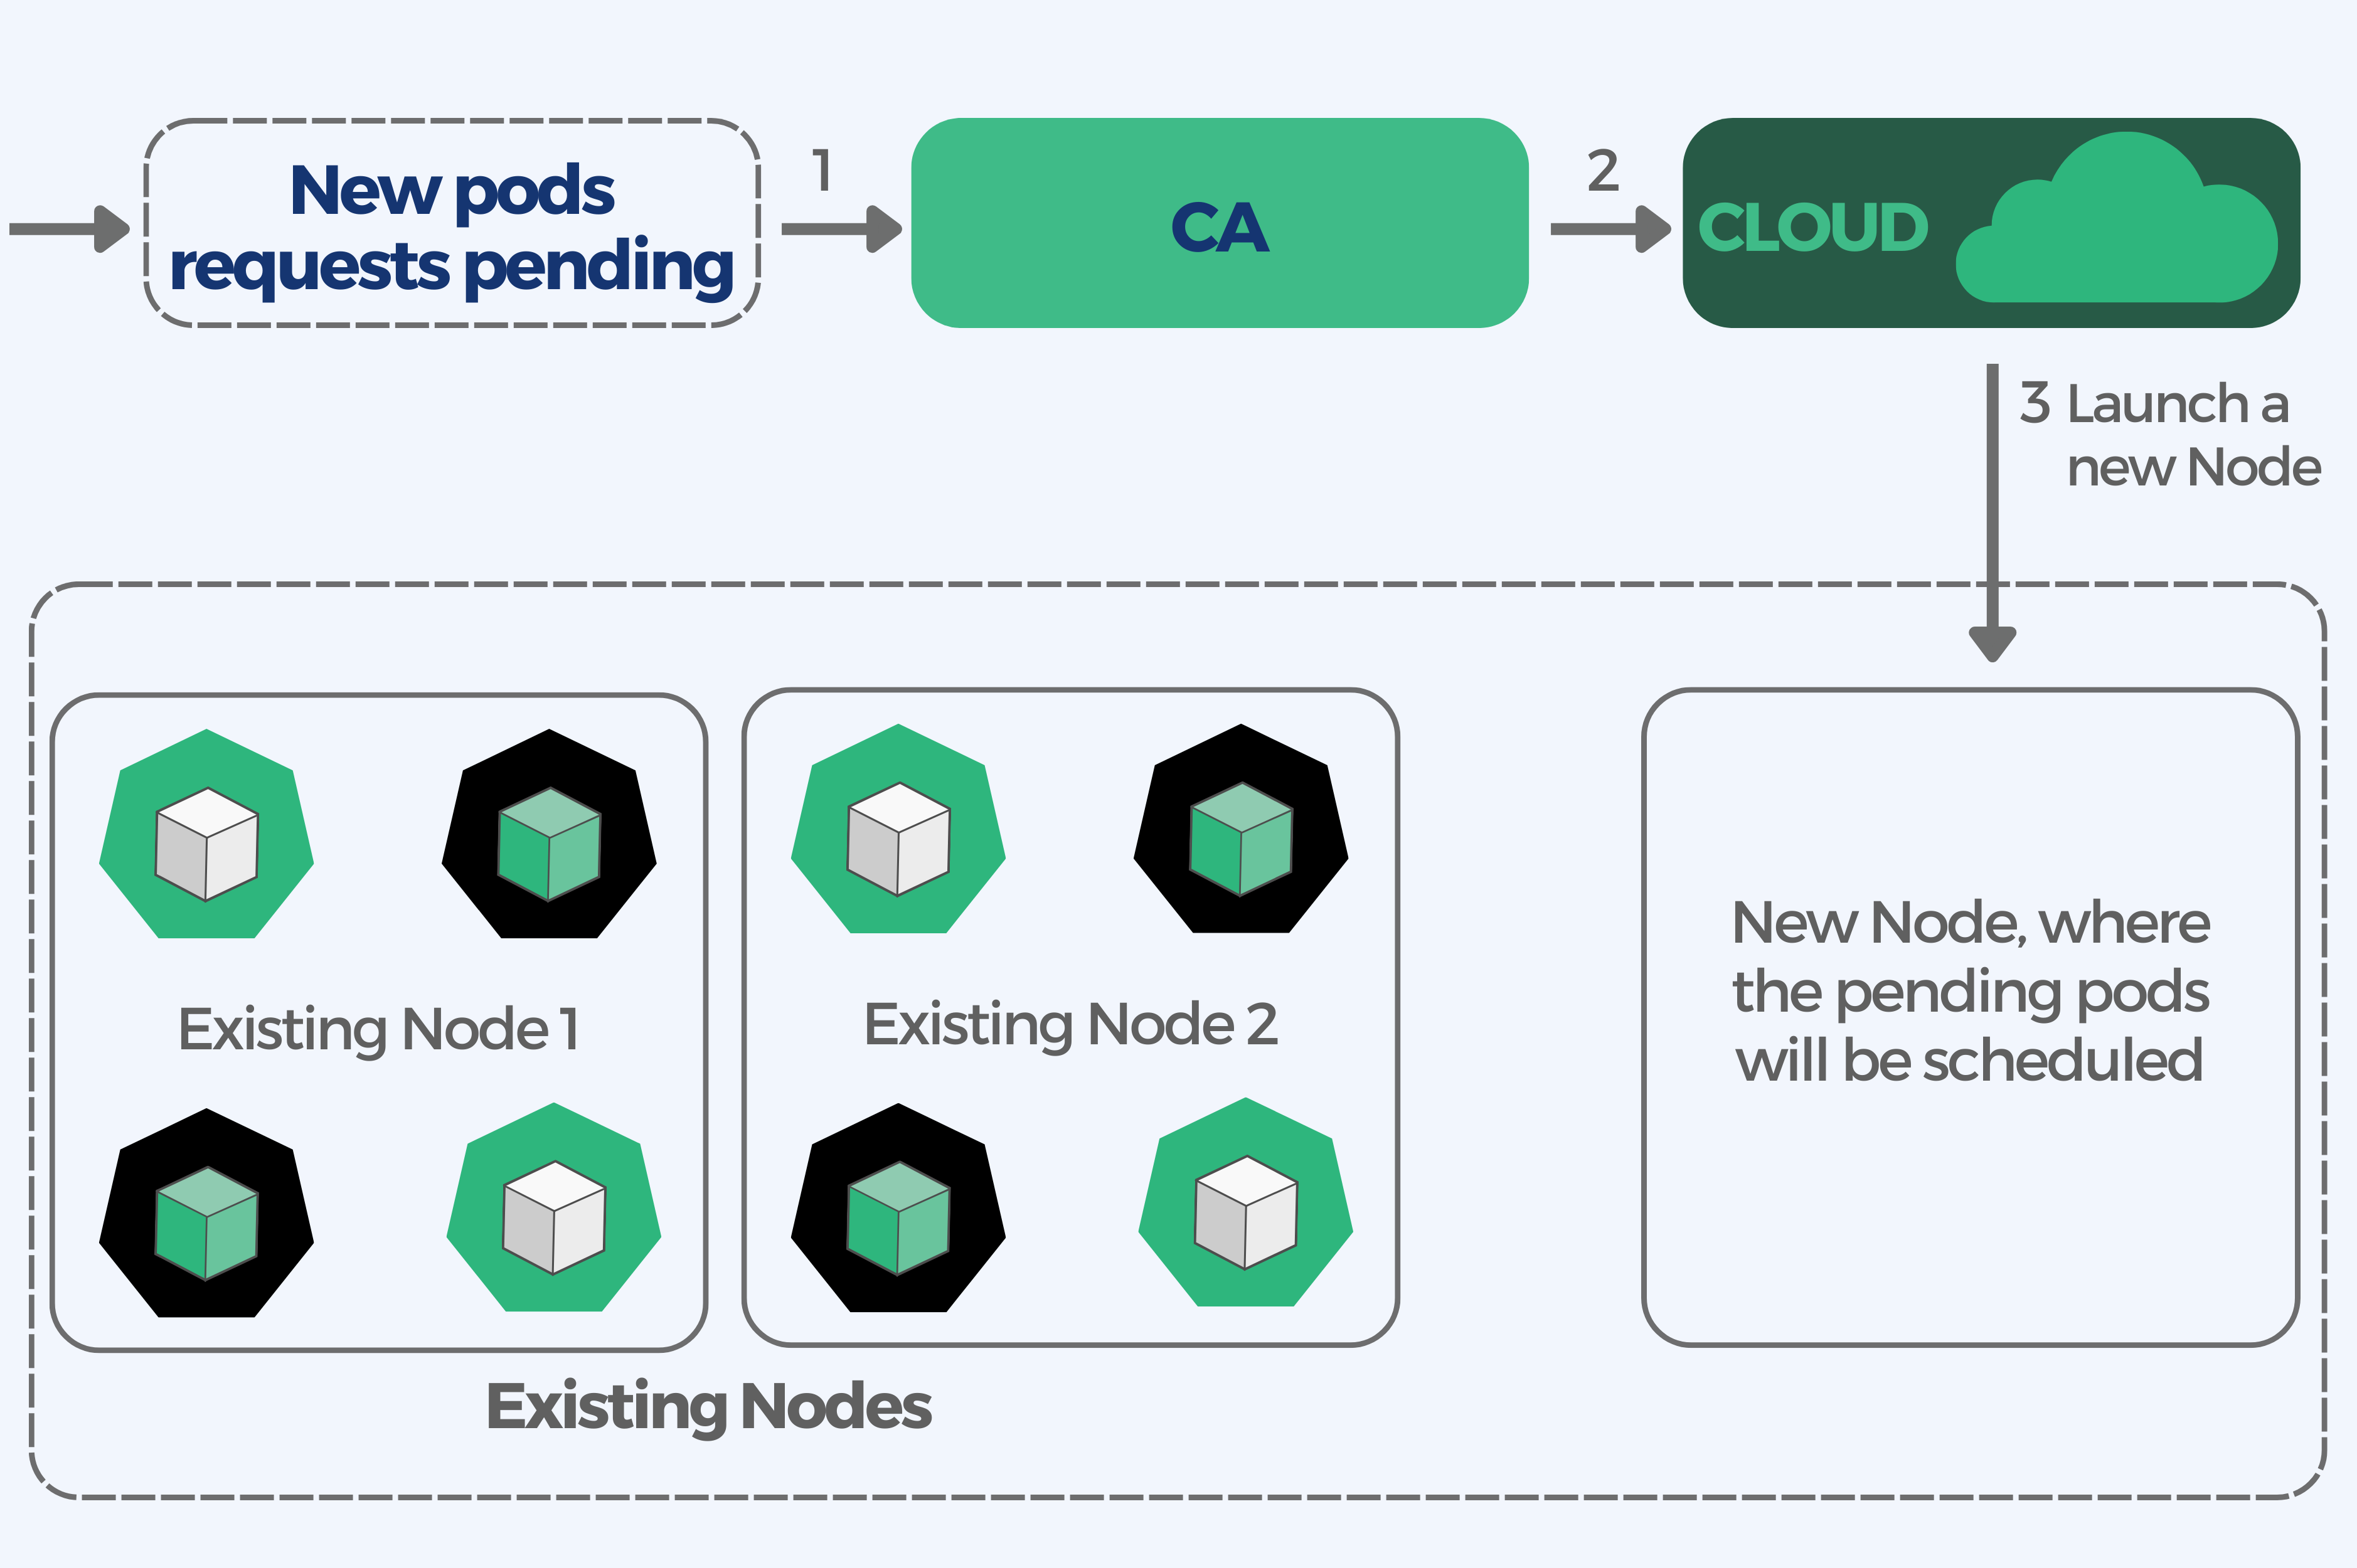
Here is how the CA scales up a cluster:
- The CA checks for pending pods with a default scan interval of 10 seconds (configurable with the scan-interval flag).
- If unschedulable pods are foung and the cluster needs more resources, CA launches a new node (minding the limits on max number of nodes).
- Kubernetes registers the newly provisioned node with the control plane to make it available to the Kubernetes scheduler for assigning pods.
- Kubernetes scheduler allocates the pending pods to the new node.
Best Practices
- It is very important to make sure that there are enough resources available for the CA pod itself. You should define a minimum of one CPU for resource requests made available to the cluster autoscaler pod. The cluster autoscaler can become non responsive if there is a resource crunch.
- The CA makes decisions based on the status of pods and utilization of individual nodes, thus the calculations have to be precise. To achieve this, make sure all pods have a defined resource request.
Limitations
- Since the CA does not use CPU or memory usage to make scaling decisions, the unused computing resources requested by users will not be detected. This leads to a cluster with low utilization efficiency. (The CA only checks pod’s requests and limits for CPU and memory resources)
- Requests to scale up the cluster take time and the performance of your application can be compromised by this delay. The CA takes around 30-60 seconds to issue a scale-up request to a cloud provider, the cloud provider can take a few minutes or more to spawn a new node.
- Cluster autoscaler does not support all managed Kubernetes platforms.
- CA does not support local PersistentVolumes which means you won’t be able to scale up a size 0 node group for pods requiring ephemeral-storage when using local SSDs.
Conclusion
Kubernetes autoscaling offers multiple ways for managing the dynamic resource demands of your applications within a cluster. By automating the process of provisioning and scaling both workloads and infrastructure, Kubernetes helps address the challenges of managing large clusters effectively.
While the three autoscaling mechanisms mentioned above (HPA, VPA and CA) offer valuable benefits, it is important to consider their limitations and adhere to best practices. Careful testing and configuration, such as setting resource requests and limits for pods and ensuring sufficient resources for the autoscaler itself, is essential for optimal performance. Additionally, avoid combining HPA with VPA for the same set of pods to prevent potential issues unless you’re using different metrics.
Implementing Kubernetes autoscaling and understanding the different types of autoscalers, can help you achieving more efficient and cost-effective platform.
Whether you need assistance with Autoscaling or any other Kubernetes topic, we’ve got you covered. Our best engineers will work closely with you to understand your unique requirements and tailor a solution that meets your specific needs. Drop us a meesage!